
Homeschool Project: Microcontroller Powered Pumpkins
Home school this year involves microcontroller programming using arduino compatible development boards. A month before haloween, we decided to build a microcontroller based pumpkin light with some fun behavior. We worked on the code several times before we actually had a pumpkin to test with, and only made minimal changes. I turned out awesome. Before I get into the details of how, here is a preview of what the final result looked like.

The Hardware
Our main hardware for teaching is the Plumduino by Plumgeek with the optional expansion board. We didn’t use the expansion board itself inside the pumpkin, but it was used in testing colors, and we use the Passive Infrared (PIR) sensor that comes with the expansion board.
We also used some jumper wires, a long USB cable, and an Anker USB Battery.
Making a Flame
We wanted the pumpkin to look like a candle during normal mode, and so some testing was required. I wrote a quick sketch that helped us choose the right color configuration. The sketch varied the hue of the NeoPixel lights with one variable resistor slider, and varied the brightness with the other. A button press changed the number of LEDs that were lit. Once every few seconds, I printed out the current settings via the serial port, to be displayed on the connected chromebook in a serial monitor.
We took our hardware and the chromebook into the bathroom with a lit candle for testing, and decided that 2 LEDs with a hue of 37 and brightness of 100 was the best match.
During in-pumpkin testing, we later adjusted the hue to decrease the red tint for a better color match. We also added some flicker behavior to mimic the look of a real candle. We also adjusted the flicker later to match, and you’ll likely need to do the same to match any other candles present in neighboring pumpkins.
Angry Eyes
We hooked up our Passive Infrared sensor, and our sketch triggers an ‘angry eyes’ mode upon sensing motion. For our angry eyes, we lit all 8 NeoPixel LEDs with a red color at full brightness, and then waited for the motion to stop before returning to normal candle flikering mode.
The Pumpkin
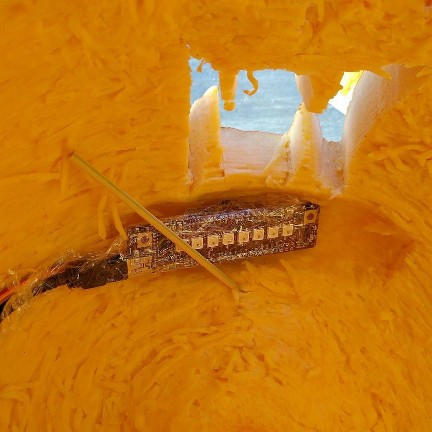
Rachel carved the pumpkin with a great pumpkin face, and we cut a small hole in the back for the USB power cable and the jumper cables for the PIR sensor. We hooked 3 sets of jumper wires together to make it long enough for a good sensor position outside the pumpkin. We could have placed the sensor insde the pumpkin, but I didn’t want it’s shadow to obsecure the pumpkin face with the light behind it. The position outside also allowed for sensor position adjustment on the steps for proper triggering.

We carved a little bit of space from inside the pumpkin for the board to sit. After bending over the jumper wires to minimize thickness, we wrapped the board in plastic wrap to protect it from pumpkin slime. A small section of wooden skewer held it nicely in place inside the pumpkin.
Things To Change
The Anker battery we used has an auto-shutoff feature. When the charging device draws less than 50 milliamps of power, it guesses that the phone has reached full power and shuts off automatically. This gave us some trouble, as the power draw in flicker only mode was less then that. If nobody tripped the sensor and the Angry Eyes mode, the batter would shut off automatically. The Angry Eyes mode did draw enough power to prevent shutoff. We could have kept a time running, and triggered the angry eyes mode without any motion detected just to prevent the battery from shutting off. Or we could have used a less sophisticated battery without an auto-shutoff feature.
Color Testing Code
This was written by me, and used for finding the ideal hue and brightness of the lights for a candle effect. I recommend testing with the other pumpkin lights you plant to use, either real candles or LED. This will help avoid last-minute adjustments to color.
In both code examples, the PlumHardware.h file contains pin definitions and other state management code for the NeoPixel lights. This file is an adjustment of the one provided by PlumGeek for my own purposes.
#include <FastLED.h>
#include "PlumHardware.h"

byte hue;
byte brightness;
byte ledcount;

long last_print;

void setup()
{
	hardwareBegin(); //sets up hardware on the board.
	ledcount = 0;
	last_print = millis();
}

void loop()
{
	//read hue from slider 1
	byte hue = map(analogRead(Slide1), 0,1024, 0,255);

	//read brightness from slider 2
	byte brightness = map(analogRead(Slide2), 0,1024, 0,255);

	//button press changes number of leds
	if(digitalRead(Button) == HIGH){
		ledcount = (ledcount + 1) % 8;
		delay(100);
	}

	FastLED.clear();

	fill_solid (leds, ledcount+1, CHSV(hue, 255, brightness));

    FastLED.show();

    if(millis() - last_print > 5000){
    	last_print = millis();
    	Serial.print("Hue\t");
    	Serial.println(hue);
    	Serial.print("Brightness\t");
    	Serial.println(brightness);
    	Serial.println("---------------");
    }
    delay(50);

}
For completeness, below are the relevant sections of the PlumHardware.h file.
// ***************************************************
// Pin defines
// ***************************************************

#define Button 2
#define DATA_PIN 4    //pixel pin, used for FastLED Library

//Pins for Plumduino Expansion Board
#define Slide1 A4
#define Slide2 A5

// ***************************************************
// end Pin defines
// ***************************************************

// ***************************************************
// General hardware
// ***************************************************
#define SERIAL_SPEED 9600    //serial speed used for Serial Monitor window
#define NUM_LEDS    8         //used for the FastLED library

CRGB leds[NUM_LEDS];        //array to hold FastLED pixel data

void hardwareBegin()
{
	Serial.begin(SERIAL_SPEED);

	FastLED.addLeds<NEOPIXEL, DATA_PIN>(leds, NUM_LEDS);  //start FastLED
	FastLED.clear();
	FastLED.show();
}
Pumpkin Code
This code was written by Rachel, with a bit of guidance and help from me along the way. We were focused on appropriate use of functions for code organization, which is why they are in heavy use in this code.
#include <FastLED.h>
#include "PlumHardware.h"
int Hueofflame = 37;
int Brightnessflame = 100;

void setup()
{
	hardwareBegin(); //sets up hardware on the board.
}
void Growflame()
{
	for(byte b = 0; b <= Brightnessflame; b++)
	{
		fill_solid( leds, 2 , CHSV (Hueofflame , 255, b));
		FastLED.show();
		delay(15);
	}
	//Grow to full flame from black.
}
void Fadeflame()
{
	//Animate decrease brightness all the way to black
	for(byte b = Brightnessflame; b > 0; b--)
	{
		fill_solid( leds, 2 , CHSV (Hueofflame , 255, b));
		FastLED.show();
		delay(15);
	}
}
void steadyflame()
{
	//chill
	fill_solid( leds, 2 , CHSV (Hueofflame , 255, Brightnessflame));
	FastLED.show();
	delay(250);
}
void FlickerFlame()
{
	//Animate decreasing brightness
	byte flickerlow = 50;
	for(byte b = Brightnessflame; b > flickerlow; b--)
	{
		fill_solid( leds, 2 , CHSV (Hueofflame , 255, b));

		FastLED.show();
		delay(5);
	}
	// wait at low brightness
	delay(50);
	//Animate increase brightness
	for(byte b = flickerlow; b <= Brightnessflame; b++)
	{
		fill_solid( leds, 2 , CHSV (Hueofflame , 255, b));
		FastLED.show();
		delay(5);
	}
}
void Angry_eyes()
{
	fill_solid( leds, NUM_LEDS , CRGB::DarkRed);
	FastLED.show();
}

void loop()
{
	FastLED.clear();
	Growflame();
	while(digitalRead(Motion) == LOW)
	{

		int r = random(100);
		if( r < 10)
		{
			FlickerFlame();
		}
		else
		{
			steadyflame();
		}
	}

	Angry_eyes();
	while(digitalRead(Motion) == HIGH)
	{
		delay(50);
	}
	delay(1000);
}